Planning Your Trip
An epic cross-country road trip with your family is not something you throw together last minute. I spend months getting our big trips organized, and honestly, the planning is half the fun.
A Note on Experience:
If you’re reading this and have never been camping before, I strongly suggest getting some real camping experience before attempting a big cross-country trip. You don’t want to be learning how to set up a tent or deal with camping gear for the first time when you’re a thousand miles from home. Get out for some weekend trips close to home, or even just camp in your backyard to work out the kinks. Spring Break is perfect for doing a mini-version: drive a few hours, camp for a few nights, and see what works and what doesn’t. Don’t let a cross-country adventure be your very first time camping.
Set Your Timeline
I recommend beginning serious planning in the fall for a summer trip. That gives you time to decide where you want to go, do research, and determine when booking windows open (which is typically six months ahead). Part of the benefit here is that most people don’t plan six months ahead, so you’re already ahead of most people trying to get spots.
Regarding the timing of your trip, the later in the summer you can go, the better, as the water will be warmer everywhere and there will be less snow/ice at high elevations.
Build Your Itinerary
Start with the big picture. Plot a few “must-see” places, trace out a realistic route, and see what else is on the way. Don’t get too ambitious on daily driving with the family. Aim for no more than 4–6 hours of driving per day, with the occasional long haul if everyone is up for it.
My starting itinerary for our most recent trip was quite basic. I opened Google Maps and a Google Doc and listed where we’d be each day. I didn’t even worry about dates at this point. Here is the actual draft I started with:
- Days 1–3: Drive west solo
- Days 4–5: Los Angeles to visit family
- Days 6–7: Sequoia
- Days 8–9: Yosemite
- Day 10: Hotel (break)
- Days 11–12: Redwoods
- Days 13–14: Oregon Coast
- Day 15: Hotel
- Days 16–17: Olympic National Park
- Days 18–19: North Cascades
- Day 20: Hotel
- Days 21–22: Glacier
- Day 23: Hotel
- Days 24–25: Rocky Mountain National Park
- Days 26–28: Drive home solo
That was it. No campgrounds, no reservations, not even driving times at first. I just needed to see how the trip might look. It ended up changing dramatically. We didn’t go to Yosemite (too crowded), visited Oregon volcanoes instead of the coast, spent four days at Olympic and skipped the Cascades, and opted for the Tetons and Yellowstone instead of Glacier and Rocky Mountain. You can find the full itinerary at the end of this chapter.
Once I had my rough outline, I spent the next couple of months researching, adjusting dates, locking in campground reservations, and figuring out drive times. You’ll tweak things as you learn what’s realistic, what’s available, and what your family is up for.
How Long to Stay at Each Place: Finding the Sweet Spot
I start by planning to camp two nights at each location. Here’s how it plays out:
- Day 1: Travel, arrive, and set up camp
- Day 2: Enjoy the area
- Day 3: Pack up and move on
For spots with just one or two things you want to do, two nights is perfect. You don’t get bored, and you keep the adventure moving. For standout places (like Sequoia or the Tetons), I stretch it to three or four nights. At Sequoia, three nights let us hit General Sherman and Moro Rock one day, and take a full day to explore Kings Canyon the next. At Grand Teton, four nights worked great—we fit in a Yellowstone day trip, a rafting trip, and plenty of time to enjoy Jenny Lake and just hang out at camp.
Just remember that the less time you spend at each spot, the more ground you cover, but you also risk missing out if you find a place you really love. The point is: don’t get stuck somewhere you’re bored, but don’t rush past the spots you really want to explore.
Choose Your Campgrounds Carefully
Where you camp makes or breaks the whole trip. I can’t emphasize this enough: not all campsites are created equal. Some are jaw-dropping, some are miserable, and you can’t always tell from the official website. I lean heavily on reviews, photos, and sometimes just gut feeling from hours of staring at satellite images or doing deep dives on Youtube to see if I can get a glimpse of a site. Make a ranked shortlist of your favorite sites, then go for them the second they open for booking.
You’ll need to determine exactly when each site opens for booking. Set calendar reminders, and practice using the reservation websites (especially recreation.gov) multiple times before the big day. Pro tip: If a campground allows you to book up to two weeks, you need to book the whole two weeks and then go back to modify your reservation after. If you don't, someone else will.
Mix in Hotel Nights
I highly recommend mixing in a hotel every 3–5 days and ideally between each campsite. It gives you a place to recharge, shower, and do laundry. It also gives you some extra time, as trying to break down a camp and then set up a new one in one day, along with driving, is rough.
Call ahead to confirm the hotel has working laundry machines, and bring a big bag of quarters. Having your loved ones run out of clean clothes is not cool, especially when it's kind of your fault.
Plan Activities, But Stay Flexible
Prioritize can’t-miss activities (I tend to plan one for the AM and one for the PM on action days), but leave space for downtime and unstructured exploration at your campsite.
My advice is to make a list of the top activities you want to do at each stop, then check the park websites and see if you need a permit or a reservation. It’s hard to think of everything, but do your best to look ahead—otherwise, you might miss out on something you really wanted to do.
A lot of the best hikes and activities in the West require advance reservations. This isn’t just about getting a campsite—some hikes (like Angels Landing at Zion), cave tours (like Crystal Cave at Sequoia), and popular spots (like Multnomah Falls near Portland) all require reservations through recreation.gov or similar sites. If you don’t know this ahead of time, you’ll show up and get turned away, which is a bummer. It’s not always obvious either, and sometimes you have to book weeks or months in advance.
Fourth Graders’ Families Get in Parks for Free!
If you have a kid either finishing up 3rd grade (going into 4th) or just finishing 4th grade, don’t miss the Every Kid Outdoors pass. My son had just finished 4th grade last year and got our whole family into every national park for free. This year, my daughter is starting 4th grade, so we get another free pass. You just go to the Every Kid Outdoors website, print out the voucher, and exchange it for a card at the entrance station. It covers entrance fees for the whole family (kids and adults in one vehicle). I don’t think a lot of people know about this, but it’s an awesome deal—basically too good to be true.
The Planner’s Reality
As the planner, anything that goes wrong—missed reservations, forgotten gear, getting lost, running out of clean clothes—is your responsibility. You’re going to spend a massive amount of time working: driving, setting up camp and breaking down camp, cleaning, cooking, planning, etc.
Truthfully, this isn’t a “relaxing” or “luxurious” vacation. You’ll be busy almost the whole time, and by the end of the trip, you do get burned out. But for us, it’s totally worth it for the experiences we get to have, and I genuinely enjoy the challenge. Just know that you have to have the right mindset, and you need to be the kind of person who can find satisfaction in the work. If that doesn’t sound fun to you, that’s okay. These trips are absolutely not for everyone, which is part of why they are possible. But if you’re up for an enormous challenge with massive rewards, this trip is for you.
Quick Start Guide: Step-by-Step Road Trip Planning
1. Decide when you want to go.
For a big western camping trip, aim for summer and start planning in the fall or early winter before your trip. More time means more options.
2. Block off your time frame.
Figure out exactly how many days you have. Be realistic about work, school, and any commitments. Three weeks is the minimum if you want to make it out west and back without rushing.
3. Pick your must-see spots.
Make a list of national parks, cool towns, or specific campgrounds you want to hit. What does your family want to see? What excites them?
4. Rough out your route.
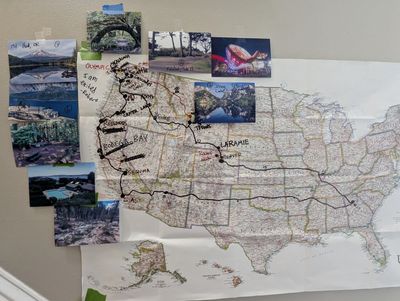
When you’re figuring out your route, I recommend getting a big paper map. Try drawing out your route by hand so you can see the big picture, spot the most direct paths, and make sure you’re not zig-zagging all over the country. Google Maps is good, but there’s something about seeing it all laid out on paper that really helps with planning. I hang one up on the wall in our house to get everyone pumped.
A quick note about drive days: Don’t stress if you have to do an eight- or nine-hour drive once in a while, even with kids. It’s not ideal to do a bunch of those back-to-back, but sometimes you need a long haul to make the rest of the trip work. You know your family’s limits better than anyone. Sometimes you just power through a big day, then recover with a slower day after.
5. Check when campsites open for booking.
Most national park campgrounds open six months ahead, often at 10 am Eastern. Mark those dates on your calendar. Figure out which nights you need to book and get familiar with recreation.gov or the state park sites.
6. Research the best campgrounds and specific sites.
Read reviews, look at photos, and make a ranked list of your top picks at each stop. If you’re using my map or list, start there, but always do your own research. There are tons of awesome places that I don’t know about.
For info on the specific best sites I have found over the years, buy the premium version of the guide.
7. Get your gear.
Make a master packing list and see what you have and what you need. Test your sleeping setup at home, especially if you’re buying something new.
8. Book your campsites (and hotels for laundry days) as soon as the booking windows open.
Use multiple devices and accounts if you want the best chance. Don’t forget to confirm your reservations and save all the emails and screenshots. For more info about booking day strategies and how to make sure to secure the best sites, see chapter 3 of the premium version.
9. Plan your meals.
Decide what you’ll cook at camp, what you’ll freeze ahead of time, and where you’ll stop for groceries and good takeout along the way.
10. Prep your car.
Get maintenance done—oil, tires, brakes, air filters, and a full checkup. Fill up bug wash for your windshield, check your spare, and get any needed repairs done before you leave.
11. Get your house ready.
Clean out the fridge, set the thermostat, arrange for pet or plant care, and leave detailed instructions for anyone checking in. Set up cameras if you want to keep an eye on things.
12. Pack up.
Load your gear by location—roof bag for camp-only stuff, crates for kitchen and daily use, suitcases and packing cubes for clothes, coolers for food and drinks.
13. Hit the road and be flexible.
Adjust your plans as you go, stay organized, and don’t sweat the small stuff. The whole point is to make memories, not to check every box.
Print this out, check things off as you go, and tweak the list to fit your own trip. This is the basic workflow that’s worked for me. Once you do it once, it gets way easier every year.
Sample Itineraries: Two Logical Cross-Country Routes
I want to share the two big trips we’ve done as examples of routes that really work if you’re planning a major western road trip. Both are solid and flexible—you could easily start with one and adapt it for your own interests or family stops along the way.
2004: The Interior Route (Rockies and Desert Focus) (Full Itinerary available in paid version)
This was our first family cross-country trip. We went down through Arizona, up through Utah and Wyoming, and then back east. You get a lot of classic Western scenery, iconic parks, and plenty of big desert and mountain landscapes. I planned this one about four months out, so a lot of the best campsites were already booked, and I didn’t really understand the reservation systems yet. We all drove out together, which meant some long days in the car. We stayed in more hotels, especially in the desert where the heat made camping tough. We also had a few nights in packed private campgrounds that were so crowded we left and found hotels instead.
Looking back, the biggest thing I learned on this trip was how I approached the campsites. In 2024, I was much more focused on the activities we’d do during the day—like exploring Yellowstone or hiking in the national parks. The campsite was kind of just a base to do all the “real” stuff. I tried to get decent campsites, but I didn’t see them as critical. What I found out the hard way is that you end up spending most of your time at your campsite, especially with kids who aren’t interested in long hikes and just want to play or relax around camp. My daughter especially was happiest just hanging out at the site. So, by the end of the trip, it really hit me that the campsite itself is the most important part of the trip—not just a place to sleep.
Another big lesson from this trip was that timing matters—a lot. We left as soon as school got out, in late May, and I just didn’t realize that the snow in the mountains can stick around for a long time. There were places like the Uinta Mountains where everything was still covered in snow, and the water was way too cold for swimming. There were even hikes we wanted to do that just weren’t possible. So, for next time, I learned to push the trip later into the summer. The later you go, the more snow will be gone, and the water will actually be warm enough to enjoy.
2025: The Western Loop (Pacific Coast and Northwest Focus) (full itinerary available in paid version)
Our second trip was a bigger loop that took us through California, Oregon, Washington, and then back across the country. This time I started planning much earlier, which helped us lock in the best campsites and plan around peak crowds. We changed up our approach too: I drove the car and gear out by myself, and the rest of the family flew out to meet me. We camped a lot more, stayed longer at our favorite places, and skipped a lot of hotels. The route itself was just as great as the first trip, just with different scenery and a lot more comfortable camping weather.
The biggest shift in how I planned 2025 was that I built the trip around the campsites themselves. Instead of seeing the campsite as just a place to crash, I tried to make sure the campsite was the actual destination, somewhere you could hang out all day and not feel like you needed to leave to have a good time. It made all the difference, especially with kids. Some of our best days were just spent hanging around camp, going down to the lake or river, and not trying to cram in a bunch of activities. We also got to visit family and friends along the way. We stopped in LA to see my sister, brother-in-law, and nephew, and later met up with my cousin and future cousin-in-law at the Hoh Rain Forest—they drove in from Seattle. If you have people you know along your route, definitely take advantage of it. Those visits are some of our best memories.
We also waited longer into the summer to start this trip, which turned out to be a big improvement. The snow was gone in the mountains, the lakes and rivers were warmer, and overall, everything was more accessible. Next time, I’ll push our departure even further into July if I can.
What We Learned (and How Our Planning Changed):
The main difference between these two trips wasn’t the route—it was really about the planning and how we approached the campsites and the timing. The first trip taught us to book as early as possible, be very picky about campsites, and pay attention to the season if you want to enjoy all the outdoor activities. The second trip was smoother in every way because we’d learned these lessons, and honestly, both routes are great. The “better” trip was just the one we planned better, but there’s a ton to love about either one. If you’re looking for inspiration, start with one of these and tweak it for your own interests, timing, and anyone you want to visit along the way.